Showing posts with label die cut. Show all posts

Monday, January 6, 2014

The Importance of Thank You Cards

When I was growing up we never sent thank you cards.  We were of course grateful for gifts given to us from family and friends.  But that was as far as it went. Sometimes we would make a call to say thank you or give the thank you in person the next time we saw the giver.  But taking the time to send an actual card? That was a foreign idea.

It wasn't until I was a young adult that the quaint notion of sending thank you cards struck me as an option.  I tried to remember to send thank you cards but it was sporadic at best. And sadly it wasn't until much later when I realized the real value of a thank you card.

I am changing the culture in my own family so that my daughter expects to send thank you cards.  In fact she gets agitated if we wait too long to write them.

Writing and sending a note of thanks takes effort.  Much more effort than a phone call, text message, or email.  To me, the call or electronic message is simply acknowledgment that the gift reached its intended recipient.  While the thanks expressed at such a moment maybe heart felt, it takes little to no effort and quickly becomes a forgotten moment in time.

The time and thought involved in putting pen to paper to send a written note is a much greater indication of gratitude.  And for those of us who keep such sentiments, the written thank you note becomes a treasure that can be revisited again and again.

Sadly the habit of not sending a note of thanks is holding on strong to the other members of my extended family. And frankly, it makes me less inclined to spend much time, thought or money on a gift the next time around. Perhaps our household's  diligence in sending thank you cards will someday light a spark of inspiration to others.

Here is a simple little thank you card I made on my Silhouette.  This is a print and cut card and will fit in a standard thank you card envelop.
You can download the Silhouette Studio file from my Google Drive by clicking here. There is also a pdf file of the card at the same link.  You will need to resize the pdf so the card prints 5" x 6 3/4" which is a standard thank you card size.

Here I dressed up the card a bit by cutting out paper circles and mounting them over the printed circles.

Please follow me on FacebookPinterest, and Bloglovin.

Featured on:
motivation-monday-iconEpic Mommy Adventure

Amaze Me MondayInspiration Monday PartyMarvelous MondaysSpread the Love Linky PartyCraft-O-Maniac Monday Link PartyMotivation MondayMonday Funday Link PartyClever Chicks Blog HopMore the Merrier MondayInspire Me MondaySnickerdoodle SundayBlock PartyHappiness is HomemadeBewitch Me & TitiHomestead Barn HopSunday Showcase PartyMommy Monday; Pin It MondayTo Do Tuesday;  Link it or Lump It Party; Inspire Me TuesdayThe ScoopTurn it up TuesdaysTuesday Confessional Link Party; Take a Look TuesdayPincentive Blog HopDo Tell TuesdayShare it Link PartyTwirl and Take a BowCountdown in Style;  Tuesday with a TwistToo Cute Tuesday; From Dream to Reality;  Pin It PartyWhimsy WednesdayHit Me with Your Best ShotSweet Wednesday Link PartyWinter Blues Wednesday{wow me} WednesdayYour Whims WednesdayInspire Me WednesdayHomemaking Link UpWow Us WednesdayLittle Bird Told Me Link PartyCenterpiece WednesdayWhatever Goes WednesdayThe Wednesday Round UpWork It WednesdayHome and Garden ThursdayTreasure Hunt Thursday; Thriving on ThursdayWildly OriginalCreate It ThursdayMade You Look Linky PartySweet and Simple FridayThe Homeacre HopPut a Bird on It; Craft Frenzy FridayFriday Link PartyTickled Pink Times Two; Farm Girl Friday

Sunday, December 15, 2013

Reindeer Candy Cane

I needed an quick craft for our December Girl Scout meeting of Daisies. Here is what I came up with.

This is a free SVG cut file for die cut machines from SVGcuts.com which can be downloaded here. To save time with our 6 year olds, I pre-cut the paper pieces on my Silhouette.  If these were older girls with better scissors skills, we would have done a similar craft where they cut the paper out themselves.
The above picture shows you everything you need except the bottle of glue.  A glue stick is not strong enough.

The only real trick to this project is to make sure you do not glue between the two cut slits in the dark brown paper. The candy cane slides through these slits so do not put any glue here.
Glue the face to the brown paper, then glue on the nose and eyes.  You could draw the eyes on too.  We finished ours with a pre-tied wired bow.
 My daughter wanted hers to be a girl so we glued the bow to the ear.
Don't forget to follow me on Facebook and Pinterest. Happy crafting!

Featured on:
Back to the Basics

Shared with: All Things Christams; Ornament Link Party; Inspire Me Tuesday; The Scoop; Turn it Up Tuesdays; Do Tell Tuesday; Tuesday with a Twist; Pincentive Blog Hop; Share It Link Party; Too Cute Tuesday; From Dream to Reality; Fall Into Fall; Wonderful Wednesday; Tuesday To Do; A Little Bird Told Me; Wow Us Wednesday; Homemaking Link Up; Wow Me Wednesday; Your Whims Wednesday; Homemade by You; Whatever Goes Wednesday; Treasure Hunt Thursday; Home and Garden ThursdayWildly Original Link Party; Live Laugh Linky; Pin It Thursday; Sock it To Me Thursday; Catch a Glimpse Party; Sweet and Simple Fridays; Homeacre Hop; Grace At Home; Create It ThursdayBlog Strut Owl Style; Tickled Pink Two Times; Friday Link Party; Craft Frenzy Friday; What to Do Weekends; From the Farm Blog HopFriday Food Frenzy; Merriest Blog HopFarm Girl Friday; Block Party

Sunday, October 20, 2013

Scrapbook Tag Album

Next weekend we will be visiting with my mother who lives in another state.  I decided to surprise her with a small photo album.  I really like the look of small random bits put together to form a whole. 
 
For this project I used three different shaped scrapbook tags and one pocket with insert.  Each was use two or three times to make the album.  For each album page, I cut two tags of the same size and shape from two different papers then glued them together.  The pocket made its own page.  Each album page was two whole punched for the binder rings.  Then I added the photos and other random bits.

This project I cut with my Silhouette Cameo but it could easily be done without a die cut machine.  Each album page is 2.5" high.  I purposefully made the length of each page/tag a little different so that elements would show down through the layers.  In general the album pages are 6" long.

The front page is a simple rectangle tag with trimmed corners on one side.  This tag came with my Silhouette Studio software but I have several similar tags among my scrapbook templates and punches.
The second page is the Cut Out Tag 1 from Bird's Cards which can be found here
http://www.birdscards.com/free-digital-cut-files/tags/.
The pocket with insert is the Library Pocket Tag from the Silhouette Online Store which can be found here http://www.silhouetteonlinestore.com/?page=view-shape&id=12937.
 The photo above is upside down and for the life of me I cannot make blogger load it correctly.  Does it drive anyone else crazy that blogger takes it upon itself to decide which way is vertical for a photo?  This was the first time blogger put the darn thing in 180 degrees wrong though.  No matter how I change it, save it, and upload it again, blogger sticks it in upside down.  So I give up but I like the page so I am keeping the upside down photo in the post.
 Here is another pocket (and this picture loaded 180 degrees upside down too). Happy crafting.

Don't forget to follow me on Facebook and Pinterest.


You can  follow me on FacebookPinterest,  BloglovinGoogle+ and Sverve.

Shared with:
Inspiration Monday; Clever Chicks Blog Hop; Pin It Monday Hop; Creative Hop and Garden Hop; Homestead Barn Hop;Motivation Monday; Momma's Meandering Mondays; Tuesdays with a Twist; Fall into Fall; Wonderful Wednesday; From the Farm Blog Hop; Homemaking Link Up; Wow Us Wednesday; Create It Thursday; Thursday Favorite Things; Sweet and Simple Friday; HomeAcre Hop; Frugal Days, Sustainable Ways; TGIF Link Party; TGIF Link Party; What to do Weekends; From the Farm Blog Hop; Farm Girl Friday; Snickerdoodle Sunday

Saturday, October 12, 2013

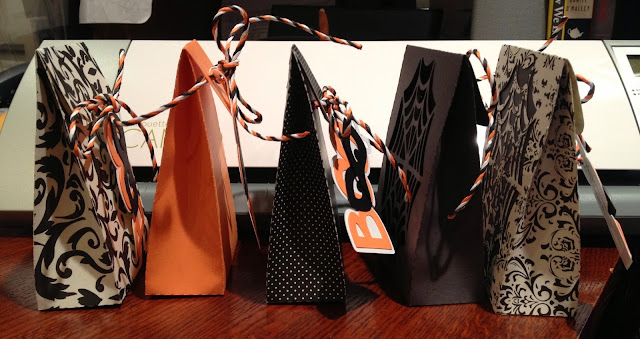
Halloween Treat Bags

Each Halloween my daughter and a few of her neighborhood friends exchange special treat bags.  Sad to say that my daughter's are usually thrown together at the last minute because Momma (that's me) has failed to plan. 

This year I am trying to stay on top of things.  This rather broad category of "things" includes the Halloween treat bags, my daughter's birthday party (which falls between Halloween and Thanksgiving), and Christmas.  I don't have an answer for Thanksgiving yet.  Oh and did I mention we are trying to buy a business and house in another state, relocate my practice, and make the move before Christmas?  My mind is full.   
I put a black paper behind the spider web cutout in this picture so it is easier to see against the patterned paper.  I won't use the paper once the bag is full of treats.
Back to the Halloween treat bags.  So now that I have my new handy dandy Silhouette Cameo die cut machine I am motivated to handle some of these tasks in a crafty way.  I found a few free cut files for various treat bags (from various holidays).  Then I found a few Halloween themed cut files.  After some editing, learning, and general toying around I came up with this spider web window treat bag.
 
I like the spider web because you can see what is inside the bag but you don't need to cover the window with plastic or velum.  Also the spider web is not inherently scary (or evil). OK when you walk into one unexpectedly, yes then the spider web is both scary and evil but that is a whole different issue.

After making a few bags, I used this free cut file from www.svgcuts.com to make a tag which I tied to the bag with orange, black, and white raffia.  The raffia goes through the top flap and the back of the back so the bag can be tied shut.


On the back of the tag I printed "Happy Halloween" with my daughter's name in a Halloweeny font. 

I am now feeling very accomplished.  Time to work on the birthday party.  Stay tuned!

Don't forget to follow me on Facebook and Pinterest.

Featured On...

Confessions of a Plate Addict

Shared with:
Inspiration MondayClever Chicks Blog HopMotivation MondayMore the Merrier MondayHomestead Barn Hop;
The ScoopInspire Me TuesdaysFall into FallWonderful WednesdaysWildcrafting WednesdaysWow Us WednesdayTreasure Hunt ThursdaysHome and Garden ThursdayCreate It ThursdayThursday Favorite Things;
Frugal Days Sustainable WaysHomemaking LinkupSweet and Simple FridayThe HomeAcre HopTGIF Link Party;
What to do WeekendsFrom the Farm Blog HopFarmgirl FridayCreative Home and Garden Hop

Saturday, October 5, 2013

Leaf Book

My kindergartener loves leaves, especially fall leaves.  We have made several leaf books over the years holding her precious collections.  This year she is even studying leaves in school.  So of course she wants another book to hold her latest collection. 

We haven't gathered the leaves yet because it has been raining so much but I did get her leaf collection book done. 

I purposely blocked out her name in the photo above but you get the idea.  I made this book with my latest toy, a silhouette cameo die cut machine.  Oh I love this machine.  But I think you could easily make this book without it.

I used tabbed recipe cards which I cut out of cereal boxes (free chip board) as pages.  I covered both sides of each page with scrapbook paper cut to the same size. The recipe cards are of course turned on their sides for the book pages.  I made them 6 inches high and a little over 3.5 inches wide.

I decorated the front cover with various leaf shapes and letters.  I added some extra detail and depth with colored pens.   
 

Then I punched two holes in each page (using the first page hole punched as a template).  I could have cut the holes with my silhouette but didn't think about it until later.  Last was to put the whole thing together with 1/2" binder rings.  
 
 Next we will gather some leaves, add some embellishments, notes, and labels.  Super simple. 

Don't forget to follow me on Facebook and Pinterest.

Back to the BasicsThe Little Homestead on the Hill
Shared with:
Related Posts Plugin for WordPress, Blogger...