Showing posts with label No Cooking Required. Show all posts

Tuesday, December 17, 2013

Colored Sugar


I am about to embark on the Christmas cookie baking binge.  One of the first steps I take each year is to make colored sugar.  You can buy this in the store of course, but it is fun to make at home and much less expensive.

All you need is some granulated sugar and food coloring. I use my normal table sugar but you can use larger crystal sugar. It is more impressive I think, but since it is something I do not usually have in my pantry (at least not in white) I just use what I have.
Any liquid or paste food coloring will work.  I usually have liquid on hand, but sometimes I have paste.  The liquid is easier to use for this project.

Take the amount of sugar you want to color and put it in a jar.  I like to do about 1/4 cup of sugar in each color.  Add one or two drops of your food coloring.  Put a lid on the jar and shake like crazy until well distributed.  You may need to take a fork and break up any clumps.
If the color is not dark enough ad another drop, close the jar, and shake again.  You can repeat this process until you get the color you want.
Here are my mixing jars.  Someday I may take the time to remove the labels completely.  I have a large collection of jars I have saved for just such purposes.

Now the last step is really important.  You need to dry the sugar.   The food coloring made it damp.  The more drops of  coloring you used the more drying it needs.  If you have a lot of time on your hand you can just leave the jar open in a warm spot and occasionally stir or shake the sugar until it is dry.  You will need to break up clumps after it is dry (just like brown sugar).
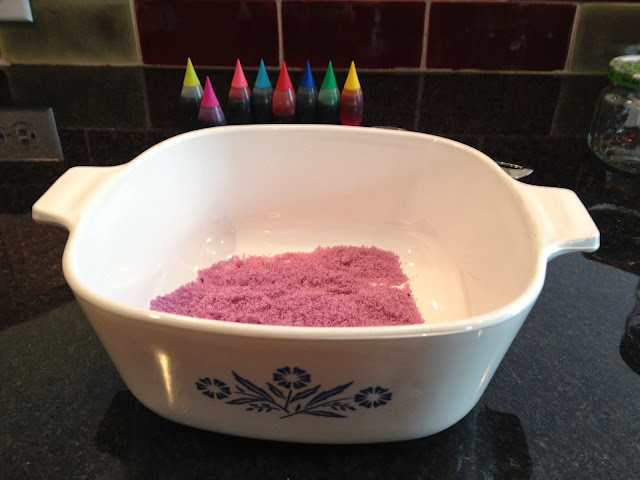
Or you can spread the sugar out in a baking dish and put it in a warm oven to dry.  Use the lowest setting on your oven; you are trying to drive off the moisture, not melt the sugar.  My oven's lowest setting is 170.  It may take 20 minutes to an hour to dry in the oven depending upon the amount of food coloring added and the humidity in the air.

One of the cool things is you can mix food colors to make new colors.  This very cool blue came from mixing a purple and several drops of sky blue.

Once dry, store your colored sugar in a sealed container until ready to use.  Watch out cookies!  Here I come!  Don't forget to follow me on Facebook and Pinterest.

Featured on:
Serenity youFriday Pin Fest at A Conquered Mess


Wednesday, November 27, 2013

Appetizer Tree

It is holiday party time.  And you know what that means.... the age old question of  "what should I bring?"  This post answers that question with one of my favorite holiday party appetizers...
The Tree
The Tree is actually simple to make but takes some planning.  What you will need is:

1 floral Styrofoam cone 12"-24" high, you pick (mine is 24" which makes a BIG Tree)
A LOT of toothpicks (I used 265 for the above pictured 24" cone)
1 disposable plastic plate (paper is not heavy enough)
A variety of toothpick friendly foods.  For the above Tree I used:

1 jar of blue cheese stuffed olives
1 jar marinated mushrooms
1 jar black olives
1 package salami
1 package peperoni
3 blocks of cheese cut into cubes (I used cheddar, pepper jack, and Swiss)
1 package grape tomatoes

Feel free to use any combination of foods you like.

Step one, rinse off the cone.  I ran mine under warm water.  I did not use soap because it would be difficult to get the soap out of all the Styrofoam pours.  It took a bit of drying to get all the water out of the cone.  You could instead wrap the cone in plastic wrap.  Using a fun holiday color like red or green plastic wrap would be festive too.

Step two, hot glue the Styrofoam cone to the plate.  This keeps the cone from sliding around on the counter or falling over.  If you only have a paper plate on which to glue the cone, you may want to add weight to the plate around the base of the cone like extra cheese or vegetables so the cone and plate do not tip over. The plastic plate I used was heavy enough.
 
The final step is to cover the cone with food.  Stick a toothpick in the food then stick the food to the cone with the toothpick.  Start from the bottom and work your way up going around the cone in layers.  You can make each layer or ring around the cone the same food like I did or mix it up, your choice.  If you start from the top the cone may get top heavy and fall over with a large cone like I used.

The cone will take way more food than you are expecting, especially if you use the 24" cone.  My cone used up almost everything listed above.  All that was left was about half a block of cheese, maybe half of the pepperoni package and half of the black olives. 

The party we went to was a going away party for some neighbors of ours moving out of state.  The tree was completely devoured (surprisingly the kids ate most of it).  There were a lot of compliments and it made a good conversation piece.  Make sure to set out a little bowl to hold all the used toothpicks or they will end up everywhere!
  
You could easily also do this with fruit. Just pick fruit that will not brown sitting out for a few hours. For a fruit Tree I would suggest red and green grapes, mandarin oranges, raspberries, cherries, strawberries, and similar items.  For a fruit Tree you could even add some dried fruit and some chocolate covered berries as well. 
Don't forget to follow me on Facebook and Pinterest.

Featured on:
Epic Mommy AdventuresAll Things ChristmasBack to the Basics
I was featured on Tasty Tuesdays at West Street Story
Shared with:
Related Posts Plugin for WordPress, Blogger...