Pages

Thursday, May 30, 2013

Vinegar weed killer? Wrong answer!

Apparently it is all the rage on Pinterest theses days to tout the miracle of using vinegar as a weed killer. But like so many things on Pinterest it appears that most of these folks love the idea but have never actually tried it. Have you seen the failed projects.  Those make me laugh more than autocorrect.


Love this vinegar on my plants... in my kitchen.

So here is the truth about vinegar as a weed killer.  It does not work. Let me say that again; a thousand internet users can be and often are wrong.  Vinegar is not an effective weed killer.

Grocery store vinegar is usually a 5% solution of acetic acid in water. A few vinegars may be a little higher percentage but still mild enough to dress a salad without gastrointestinal trauma.

Spraying vinegar on the leaves of a plant damages the foliage.  If it is a small enough plant the vinegar might even kill the foliage.  But vinegar spray won't kill the roots.  If the root lives, the plant will grow back.

Dumping vinegar on a plant doesn't kill the plant either but it might harm the earthworms you want in your garden. And ultimately it just wastes perfectly good salad dressing.

Some garden centers (and Amazon.com) sell a 20% acetic acid solution as a weed killer.  This will kill many, but not all plants. It works better on broad leaf weeds than grass weeds.  However now you are working with a much stronger acid that can be very dangerous (think skin burns and blindness).

Do yourself a favor and keep the vinegar out of the garden and try an effective weed killer instead... Perhaps a large dog, small child, chickens, etc.  Or you could pull weeds, which I find very therapeutic.  Or you can even smother them with newspaper, plastic, or cardboard.

Wednesday, May 29, 2013

Around the garden

It has been cold and wet for weeks now.  But at least is hasn't snowed in a while.  The garden is growing slowly but there are a few plants that seem to be enjoying this weather.

Potatoes going strong
These are my Norland Red potato plants.  They are big, strong and healthy in spite of the cool soil temperature. 

Tiny Green Bean Bed

This is my green bean bed.  We had so many green beans last year that I cut way back.  The two plants in the back are climbers and the two in the front are bush beans.  The large green clump in the front left is one of my many chives.

Onion sets

Here is an onion bed which is just to the left of the green bean bed.  While it is hard to see in this picture, they are all planted in nice straight rows.  My hubby planted them this year.  When I plant them, they come up in unruly clumps.
Telephone Pole Peas

Growing at the base of the net trellis are telephone pole peas.  This is an heirloom variety of climbing pea that we first tried last year.  To be honest, we have not had the most luck with heirloom varieties.  Some of that may be our inhospitable climate and some of that is because for many heirlooms, there is just not enough information about the requirements of the plants so we have to do our best and guess. 

These peas were a heavy producer.  Much heavier than I was expecting.  My daughter would run outdoors and pick peas by the handful, eating them pod and all!  I am so glad she loves veggies.

We saved lots of telephone pole pea seeds last year, simply letting the pods dry on the vine.  When we cleaned out the peas at the end of the season I shelled all the dried peas and stored them in a paper bag (which I remembered to label... an ongoing theme for me).  The saved seeds were sown thickly and are doing well.

Behind the peas are the catnip plants.  With this many cats we need catnip, it just wouldn't be right otherwise.  To the right of the peas is the lower strawberry patch.

The soil to the left of the peas is actually full of corn.  The corn is about 2 inches tall and can't even be seen in the picture.  At this rate we may have corn for Halloween!

Homemade Multi-Grain Pancake Mix

In addition to PB&J, my daughter loves pancakes; chocolate chip pancakes to be exact. Since pancakes have become part of our routine three or four days a week I decided that we needed a healthier option than all purpose flour or even worst some store bought pre-made pancake mix.

My solution is to make my own pancake mix which starts with grinding my own flour.  I have some friends who think it is simultaneously amazing and crazy that I would make my own flour and I must admit when I first learned it was even possible I was pretty much feeling the same way about it.  But now it just reminds me just how far removed most of us (including me) have become from the sources of our food.

Let me tell you a secret, grinding flour is really easy.  I fill up the hopper, push a button, and I get flour.  See simple.  Well OK I did first have to purchase a grain mill.  The decision on what grain mill to buy is the topic for a whole other post.  My grain mill is a Family Grain mill.
Family Grain Mill (bowl not included)
I can operate it by hand or with the motor.  And I have learned I like electricity so as long as it is available, I will be using the motor.  Grinding grain by hand could be a good discipline measure for teenagers. Let them choose between being grounded for a week or hand grinding grain for half an hour.  After the first time they will pick the grounding every time I would bet.  That would be a good book title "Grounding or Grinding."

I start the pancake mix process by grinding a variety of grains into flour.  I use whatever I have on hand. I buy grains in bulk, usually in twenty-five pound bags. With so much grain on hand I have had to become creative with its uses... getting creative with the use of grains really was more of a defensive measure given the amount of space it takes up.  Why buy the stuff if you don't use it?


Today I happen to have Kamut (which is a type of wheat), Spelt, barley, hard red wheat, and rolled oats.  There are lots of things that could be said about the nutritional value of rolled oats verses some other type of oats but that is not what this post is about.
From left to right: Barley, Hard Red Wheat, Rolled Oats, Kamut, and Spelt

See how pretty all the grains look!  That makes me happy.

I fill up the grain mill with the five grains and push the button.  See flour comes out the bottom.

I do not bother to measure how much of any of the grains I use.  As the grain is ground I keep filling up the hopper  until I get as much flour as I want for my pancake mix.

I often will take some of the freshly ground flour and freeze it in a ziptop bag.  Flour loses its nutritional value very quickly after grinding. I would like to think freezing slows down some of the degradation. I rarely have time to grind flour on an as needed basis.  So I keep some in the freezer; and yes, I do have a bag of all purpose flour in the pantry too.

Once the flour is ground I measure it out into a big pail I use to store the pancake mix.

This is made of food grade plastic. Please don't think any old bucket will do.  This bucket is fitted with a gamma seal lid allowing the top to screw on and off rather than being pried off.

Today I added fifteen cups of flour.


Then I add to the flour the appropriate amounts of sugar, baking powder, and salt. Feel free to use your favorite pancake recipe but for me it is 1 cup flour, 1 tablespoon sugar, 2 teaspoons baking powder, 1/4 teaspoon salt.  Obviously I did this fifteen times (well I used a conversion chart... 16 tablespoons = 1cup; 3 teaspoons  = 1 tablespoon; etc.).

Then I closed up the bucket and rolled it around to mix all the ingredients.  The last step is to put a "cheat sheet" on top of the mix listing all the wet ingredients to be added later.

Please don't add the wet ingredients until time to cook. Can you imagine the nasty smelly mess you would get letting that sit in your pantry (shudder).  For the recipe I use, for each cup of the dry mix add 1 cup of milk or water (I prefer milk), 1 beaten egg, and 2 tablespoons of vegetable oil (I prefer olive oil).  Two cups of mix with the proper amount of wet ingredients makes 12 - 14 pancakes.

The pail gets closed up and stored in the pantry for future use.

As for the chocolate chip pancakes, I cannot tell you how many times I put chocolate chips into the batter then tried to scoop them out of the bottom of the bowl to cook.  It doesn't work well.  Now I am smarter and drop chocolate chips into the cooking batter on the griddle before I flip the pancakes.


And in this way, only my little one ends up with chocolate chips. We finish off the pancakes with real organic butter (much healthier than you would think) and real maple syrup.

Don't forget to follow me on Facebook and Pinterest.

This post has been shared on:

Clever Chicks Blog Hop
Sunny Simple Mondays
Homestead Barn Hop
Tuesdays with a Twist
Frugal Days, Sustainable Ways
Down Home Blog Hop
Wildcrafting Wednesday


Monday, May 27, 2013

Memorial Day


Thank you for your service.  We will not forget!

Strawberry Rocks


We have two strawberry patches among our gardens. One is in the lower garden in a hot dry corner up against the house. The strawberries thrive here where nothing else has but I do need to make sure to make sure it doesn't completely dry out.
Lower strawberry patch
The second strawberry patch is in an upper bed near the front porch.  The strawberries were planted in this bed as a ground cover to replace the bee balm that had succumb to some sort of powdery mildew.
Upper strawberry patch 
Each year we harvest enough strawberries to make and can at least two gallons of strawberry jam. My daughter eats PB&J like it is going out of style.  I like knowing where the strawberries in her jam came from, who touched them, and what was or was not applied to them. If it was warm enough here I would grow the peanuts too. But so far she has been unwilling to eat homemade peanut butter.  I need to make a mental note to try the homemade peanut butter again.

Last year our abundant chipmunk population took a liking to the strawberries too. In years past the chippys have pretty much left them alone.
One of our happy chippys (he? was unwilling to pose any closer)
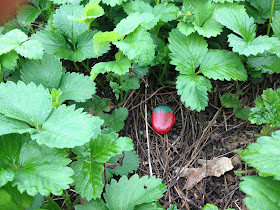
We also had a few cedar wax wings enjoying the berries last year.  That was the first time I had seen them in the yard so I welcomed them (I am also a bird nerd). But the chipmunks developed a bad habit of taking a bite out of the biggest berries then leaving them on the vine which made harvesting rather frustrating. So this year I am going to try to outsmart the chippys with rock strawberries.

I have seen this idea suggested in a couple of different places. Basically you paint small rocks to look like strawberries.  I used some smooth river rocks we have covering the soil in our house plants (which keeps the cats from digging in the pots).
River rock in house plant (variegated dracaena)
First I painted them all over with a bright red outdoor acrylic paint.  The river rocks were black so it took many coats of the red paint to get a bright enough red.  I should probably have primed the rocks first to help with the coverage.  The paint was brushed on but could have easily been spray painted. Then I painted the green leafy tops and black spots.  I am pretty sure the spots are for my enjoyment rather than being useful.  Strawberries of course don't have black seeds, at least not the kind we grow. I don't know, are there strawberries with black seeds?

For a more authentic look a light yellow would have been a better seed color choice. But from the chipmunk's point of view, spots or no spots is not a big concern.  Well at least I think it isn't a concern.  I can't say I have ever really asked a chipmunk if it has a strawberry seed color preference.

But I digress.  A lot.  Might as well get used to it.  I let the painted rocks dry overnight then sprayed them with a sealer.  There are a lot of products available for this purpose.  I happened to have a clay pot sealer spray that is meant to waterproof terra cotta pots.  It has worked well for many applications.  I bought it originally to actually waterproof clay pots I had painted to look like honey pots which we used to hold flower arrangements for our Winnie the Pooh themed wedding at Disney World.  Perhaps that will be a future post.


I have also used it to spray glitter covered items (which with a five year old turns out to be a huge number of things) and it has worked amazingly well at keeping the glitter put and out of my house!
Ready for the strawberry patch
The next step is to place the strawberry rocks in the strawberry patches.  The theory is that the chippys will find the bright red rocks in the patch thinking they are food, sniff the rocks to determine they are not food, then try again with the next strawberry rock.  After doing this over and over again for many days they will give up. So when the strawberries actually ripen the chippys will (hopefully) ignore them thinking the real strawberries are just rocks.  Obviously the rocks need to be in the garden at least a couple of weeks before the strawberries ripen.  I will let you know how it works.


Don't forget to follow me on Facebook and Pinterest.

Sunday, May 26, 2013

About me

I am forty-something living in the northern plains of the mid-west. I have a wonderful husband and five year old daughter. And now I know why people have children in their twenties rather than their forties. We have friends from high school with grandchildren the age of our daughter.

So we are pretty much never going to be able to retire. But we are also not able to sink quietly into old age either. Old age is a sneaky bastard. Before you know it you are planning your schedule around reruns of Jeapordy and a late dinner at 4:30.

I have been practicing law for twenty years and before that I was a chemist.  I have my own law firm so my schedule is pretty much my own, which has been really helpful having been a mostly full time mom for the last five years.  When my little one goes to kindergarten in the fall my clients are going to be happy to see more of me.  I will probably cry.  OK I know I will cry.  Which brings me back to the point of this blog. In a perfect world, in the fall I won't be actively practicing law anymore.

I love Jesus, plants, animals, computer games, epic fantasy (that is a type of literature), wine, chocolate, useless trivia and Handy Manny. I am bossy, opinionated, and unable to not speak my mind which actually makes me a good attorney but not such a good employee hence why I work for myself.  That last trait also makes me a challenging friend to have but I am also loyal, honest, trustworthy and kind (in a brutally honest sort of way).

I was born and raised in California, went to law school on the East Coast, and now, live here in flyover land.  My husband is a Texas boy and a horticulturist. We have lived up here for thirteen years and now think it is time to make a big change.

Me in my happy place (a decade or two ago)
We have made small steps along the way: trying to live a more simple and sustainable life; trying to become more self-sufficient; learning new skills; getting out of debt; reevaluating our priorities; and many more.  Now we are trying to work out a move to the country to live and start our own related business.  Details to come!


About the name

This really isn't a blog about cats. This is about turning our suburban home into our homestead one baby step at a time. We just happen to have a cat or two or eight. But that is down from our high water (cat) mark of seventeen. Yes you read that right!

Now before you write me off as a crazy cat lady (which I may very well be...but that is a post for another day) let me explain.

A gift from my mother

Our neighborhood sits next to some old farmland. A few years ago a few of the smaller farms were purchased by a developer (which still hasn't been developed by the way). Barns were torn down and the families moved out. The farm cats however remained left to their own devises. Most of the cats were killed by cars in their search for food. Those that remained were in bad shape. Cats don't live well off hunting. Cats kill for fun, not for food. Well fed farm cats are killing machines. Unfed farm cats die young.

Several of these farm cats made their way to our patio to eat stale bread and seed left out for the birds. It was the emaciated mother cats trying to nurse and feed themselves any way they could that broke our hearts. Over the next three years we rescued twenty-three of these abandoned farm cats; some came willingly, most not so much. Each cat was given its shots, neutered, and was socialized. We placed fourteen cats in good homes. The older cats were given lots of love in our home but each of them died within two years from (at least according to our vet) complications that arose from malnutrition as kittens.

Of the eight left in our home, we consider three of them our cats (we had them before the farm cat saga began but even two of the three are rescue cats too). The others are interlopers in search of a permanent home. At least that is what we tell ourselves. The likelihood of us placing any of these cats in a new home is ... well let's just say we have stopped looking for new homes.


Some of the cats in the wild
 
In their natural habitat (there are 4 cats in this picture)


So on this journey you will often meet the cats on the homestead. I hope you aren't allergic!

In the beginning...

Once upon a time a boy fell in love with a girl. They got married, built a house, had a child, climbed corporate ladders, and kept up with the Jones.  And after they achieved success according all the usual standards they decided it was time for a change. Worldly success is fine but generally unsatisfying.

So slowly they began to make small changes from learning to cook from scratch to growing their own produce. As the choices they made changed so did their perspective. This blog will follow their life, my life, to see where things end up. Welcome to our journey.