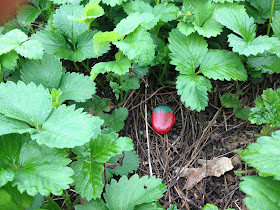
We have two strawberry patches among our gardens. One is in the lower garden in a hot dry corner up against the house. The strawberries thrive here where nothing else has but I do need to make sure to make sure it doesn't completely dry out.
 |
| Lower strawberry patch |
The second strawberry patch is in an upper bed near the front porch. The strawberries were planted in this bed as a ground cover to replace the bee balm that had succumb to some sort of powdery mildew.
 |
| Upper strawberry patch |
Each year we harvest enough strawberries to make and can at least two gallons of strawberry jam. My daughter eats PB&J like it is going out of style. I like knowing where the strawberries in her jam came from, who touched them, and what was or was not applied to them. If it was warm enough here I would grow the peanuts too. But so far she has been unwilling to eat homemade peanut butter. I need to make a mental note to try the homemade peanut butter again.
Last year our abundant chipmunk population took a liking to the strawberries too. In years past the chippys have pretty much left them alone.
 |
| One of our happy chippys (he? was unwilling to pose any closer) |
I have seen this idea suggested in a couple of different places. Basically you paint small rocks to look like strawberries. I used some smooth river rocks we have covering the soil in our house plants (which keeps the cats from digging in the pots).
 |
| River rock in house plant (variegated dracaena) |
For a more authentic look a light yellow would have been a better seed color choice. But from the chipmunk's point of view, spots or no spots is not a big concern. Well at least I think it isn't a concern. I can't say I have ever really asked a chipmunk if it has a strawberry seed color preference.
But I digress. A lot. Might as well get used to it. I let the painted rocks dry overnight then sprayed them with a sealer. There are a lot of products available for this purpose. I happened to have a clay pot sealer spray that is meant to waterproof terra cotta pots. It has worked well for many applications. I bought it originally to actually waterproof clay pots I had painted to look like honey pots which we used to hold flower arrangements for our Winnie the Pooh themed wedding at Disney World. Perhaps that will be a future post.
I have also used it to spray glitter covered items (which with a five year old turns out to be a huge number of things) and it has worked amazingly well at keeping the glitter put and out of my house!
 |
| Ready for the strawberry patch |
The next step is to place the strawberry rocks in the strawberry patches. The theory is that the chippys will find the bright red rocks in the patch thinking they are food, sniff the rocks to determine they are not food, then try again with the next strawberry rock. After doing this over and over again for many days they will give up. So when the strawberries actually ripen the chippys will (hopefully) ignore them thinking the real strawberries are just rocks. Obviously the rocks need to be in the garden at least a couple of weeks before the strawberries ripen. I will let you know how it works.

Don't forget to follow me on Facebook and Pinterest.


How totally cute! I love those strawberry rocks on their own, but I am totally curious...did it work??
ReplyDeleteHi Kim. Yes it worked so much better than I thought it would. There was still a little chewing damage from the chipmunks but so much less than years past. I made about 20 or so of the strawberry rocks but I think I need to double it for better coverage in the two different strawberry beds. Thanks for dropping by!
ReplyDeleteThanks for letting us know that the painted strawberry rocks were effective. I read several articles about using strawberry rocks this morning, but nobody said whether they worked!
ReplyDeletekyrie 5 spongebob
ReplyDeletegolden goose sneakers
kyrie irving shoes
a bathing ape
kyrie shoes
cheap jordans
kd shoes
kyrie 7
hermes birkin
golden goose outlet
daaozuu783js
ReplyDeletesupreme outlet
golden goose outlet
golden goose outlet
supreme outlet
golden goose outlet
golden goose outlet
golden goose outlet
golden goose outlet
golden goose outlet
golden goose outlet